DART-6UL Yocto NAND Recovery: Difference between revisions
No edit summary |
|||
| (29 intermediate revisions by 4 users not shown) | |||
| Line 1: | Line 1: | ||
{{PageHeader|DART-6UL - Yocto | {{PageHeader|DART-6UL - Yocto recovery SD card}} {{DocImage|category1=DART-6UL|category2=Yocto}} | ||
Variscite provides a recovery SD card image that can be used to install the pre-built U-Boot, Linux kernel and the file system into the internal storage of the SOM. | |||
== Download the recovery SD card image == | |||
Download mx6ul-dart-recovery-sd.vXX.img.gz (latest) from Variscite's FTP server: sftp://customerv@ftp.variscite.com/Public/DART-6UL/Software/yocto/legacy-images | |||
For more information about Variscite's FTP server, see: https://variwiki.com/index.php?title=FTP | |||
== Write the image to an SD card == | |||
=== Using a Linux based host === | |||
<pre>$ gunzip mx6ul-dart | Plug-in the SD card to your Linux HOST PC, run dmesg and see which device is added (i.e. /dev/sdX or /dev/mmcblkX) | ||
$ sudo dd if=mx6ul-dart | <pre> | ||
Replace /dev/sdX with your | $ gunzip mx6ul-dart-recovery-sd.vXX.img.gz | ||
$ sudo umount /dev/sdX* | |||
$ sudo dd if=mx6ul-dart-recovery-sd.vXX.img of=/dev/sdX bs=1M | |||
(Replace /dev/sdX with your actual device) | |||
</pre> | </pre> | ||
== Recover | === Using a Windows based host === | ||
Download Win32 Disk Imager from: https://sourceforge.net/projects/win32diskimager/, install and run it.<br> | |||
Select the image file, and the SD card device - double check that the device is correct to avoid accidentally overwriting a different device.<br> | |||
Click on "Write".<br> | |||
No need to format the SD card before writing the image to it.<br> | |||
== Recover NAND flash/eMMC == | |||
* Power-off the board. | |||
* Insert the SD card into the SD card slot of the carrier board (DVK) | |||
* Make sure the Boot DIP switches are set to SD card: [[DART-6UL Yocto Krogoth R2 build#Setting the Boot DIP switches|Setting the Boot DIP switches]] | |||
* Power up the board - it will boot into Linux from the SD card | |||
=== Flash from GUI === | === Flash from GUI === | ||
[[File: | [[File:DART-6UL_Recovery.png]] | ||
<br><br> | |||
Touch/Click on the appropriate icon: | |||
* Install Yocto NAND, WiFi: Flash Yocto with WiFi support to NAND flash | |||
* | * Install Yocto NAND, SD card: Flash Yocto with SD card support to NAND flash | ||
* | * Install Yocto eMMC (SD/WiFi) : Flash Yocto to eMMC (installs both SD card and WiFi dtbs to the BOOT partition and let U-Boot select between them at boot time) | ||
=== Flash from command line === | === Flash from command line === | ||
*Login as root (no password) | * Login as root (no password) | ||
* From Linux command line, type one of flash options | * From Linux command line, type one of flash options | ||
<pre> | <pre> | ||
$ | $ install_yocto.sh - Flash Yocto into eMMC or NAND Flash (Follow instructions) | ||
</pre> | </pre> | ||
=== | === SD card image file tree === | ||
<pre> | <pre> | ||
/opt/images/ | |||
└── Yocto | └── Yocto | ||
├── | ├── imx6ul-var-dart-emmc_wifi.dtb | ||
├── imx6ul-var-dart-nand_wifi.dtb | |||
├── imx6ul-var-dart-sd_emmc.dtb | |||
├── imx6ul-var-dart-sd_nand.dtb | |||
├── rootfs.tar.bz2 | ├── rootfs.tar.bz2 | ||
├── rootfs.ubi | ├── rootfs.ubi | ||
├── SPL-nand | ├── SPL-nand | ||
├── SPL-sd | ├── SPL-sd | ||
├── u-boot-nand | ├── u-boot.img-nand | ||
├── u-boot | ├── u-boot.img-sd | ||
└── zImage | |||
└── zImage | |||
</pre> | </pre> | ||
<pre> | <pre> | ||
The install_yocto.sh script file is located at /usr/bin/ | |||
</pre> | </pre> | ||
Latest revision as of 22:05, 22 August 2024
Variscite provides a recovery SD card image that can be used to install the pre-built U-Boot, Linux kernel and the file system into the internal storage of the SOM.
Download the recovery SD card image
Download mx6ul-dart-recovery-sd.vXX.img.gz (latest) from Variscite's FTP server: sftp://customerv@ftp.variscite.com/Public/DART-6UL/Software/yocto/legacy-images
For more information about Variscite's FTP server, see: https://variwiki.com/index.php?title=FTP
Write the image to an SD card
Using a Linux based host
Plug-in the SD card to your Linux HOST PC, run dmesg and see which device is added (i.e. /dev/sdX or /dev/mmcblkX)
$ gunzip mx6ul-dart-recovery-sd.vXX.img.gz
$ sudo umount /dev/sdX*
$ sudo dd if=mx6ul-dart-recovery-sd.vXX.img of=/dev/sdX bs=1M

(Replace /dev/sdX with your actual device)
Using a Windows based host
Download Win32 Disk Imager from: https://sourceforge.net/projects/win32diskimager/, install and run it.
Select the image file, and the SD card device - double check that the device is correct to avoid accidentally overwriting a different device.
Click on "Write".
No need to format the SD card before writing the image to it.
Recover NAND flash/eMMC
- Power-off the board.
- Insert the SD card into the SD card slot of the carrier board (DVK)
- Make sure the Boot DIP switches are set to SD card: Setting the Boot DIP switches
- Power up the board - it will boot into Linux from the SD card
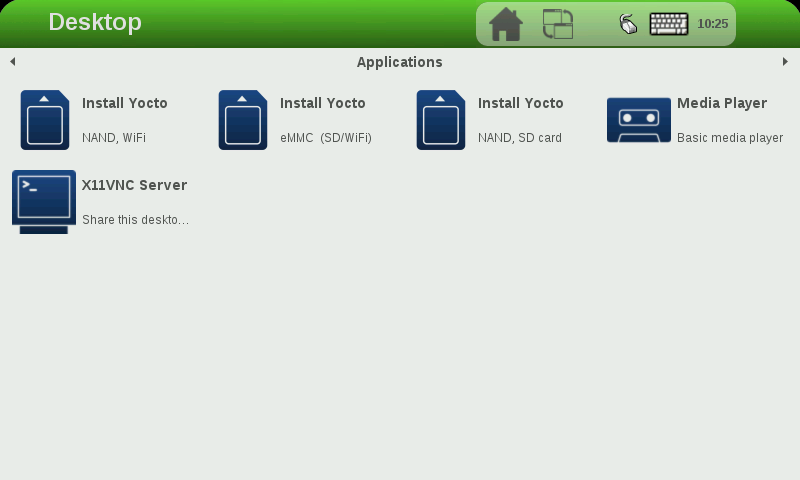
Flash from GUI

Touch/Click on the appropriate icon:
- Install Yocto NAND, WiFi: Flash Yocto with WiFi support to NAND flash
- Install Yocto NAND, SD card: Flash Yocto with SD card support to NAND flash
- Install Yocto eMMC (SD/WiFi) : Flash Yocto to eMMC (installs both SD card and WiFi dtbs to the BOOT partition and let U-Boot select between them at boot time)
Flash from command line
- Login as root (no password)
- From Linux command line, type one of flash options
$ install_yocto.sh - Flash Yocto into eMMC or NAND Flash (Follow instructions)
SD card image file tree
/opt/images/
└── Yocto
    ├── imx6ul-var-dart-emmc_wifi.dtb
    ├── imx6ul-var-dart-nand_wifi.dtb
    ├── imx6ul-var-dart-sd_emmc.dtb
    ├── imx6ul-var-dart-sd_nand.dtb
    ├── rootfs.tar.bz2
    ├── rootfs.ubi
    ├── SPL-nand
    ├── SPL-sd
    ├── u-boot.img-nand
    ├── u-boot.img-sd
    └── zImage
The install_yocto.sh script file is located at /usr/bin/