VAR-SOM-MX6 Android Ethernet: Difference between revisions
From Variscite Wiki
No edit summary |
|||
| Line 3: | Line 3: | ||
--> {{#lst:Android_Platform_Customization|{{#var:RELEASE_PARAM|RELEASE_N7.1.1_1.0.0_VAR-SOM-MX6}}}} <!-- | --> {{#lst:Android_Platform_Customization|{{#var:RELEASE_PARAM|RELEASE_N7.1.1_1.0.0_VAR-SOM-MX6}}}} <!-- | ||
--> {{PageHeader|{{#var:HARDWARE_NAME}} - Android {{#var:ANDROID_NAME}} {{#var:ANDROID_VERSION}} - Ethernet}} {{DocImage|category1=Android|category2={{#var:HARDWARE_NAME}}}} __toc__ | --> {{PageHeader|{{#var:HARDWARE_NAME}} - Android {{#var:ANDROID_NAME}} {{#var:ANDROID_VERSION}} - Ethernet}} {{DocImage|category1=Android|category2={{#var:HARDWARE_NAME}}}} __toc__ | ||
Ethernet Manager is part of the system image by default.<br> | Ethernet Manager is part of the system image by default.<br> | ||
Simply plug in the Ethernet cable and it will connect using DHCP by default. | Simply plug in the Ethernet cable and it will connect using DHCP by default. | ||
= Ethernet configuration tool = | |||
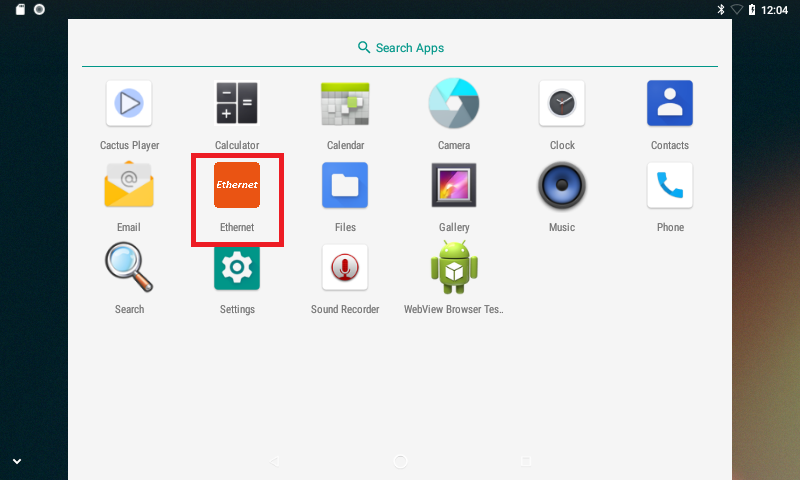
In your desktop menu, you should have an application called Ethernet, as shown in the below image:<br> | In your desktop menu, you should have an application called Ethernet, as shown in the below image:<br> | ||
{{#ifeq: {{#var:HARDWARE_NAME}} | VAR-SOM-MX6 | [[File:Ethernet_Home_Screen.png]] |[[File:Imx8_Ethernet_Home_Screen.png]]}}<br> | {{#ifeq: {{#var:HARDWARE_NAME}} | VAR-SOM-MX6 | [[File:Ethernet_Home_Screen.png]] |[[File:Imx8_Ethernet_Home_Screen.png]]}}<br> | ||
| Line 14: | Line 14: | ||
{{#ifeq: {{#var:HARDWARE_NAME}} | VAR-SOM-MX6 | [[File:Ethernet_App_Home_Screen.png]] |[[File:Imx8_Ethernet_App_Home_Screen.png]]}} | {{#ifeq: {{#var:HARDWARE_NAME}} | VAR-SOM-MX6 | [[File:Ethernet_App_Home_Screen.png]] |[[File:Imx8_Ethernet_App_Home_Screen.png]]}} | ||
= Ethernet DHCP configuration = | |||
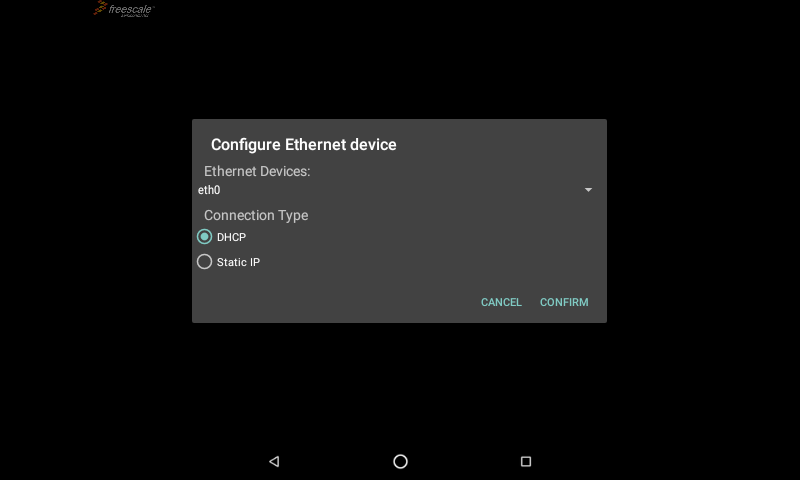
As written before, the default connection type is DHCP.<br> | As written before, the default connection type is DHCP.<br> | ||
You can change it to static IP, using the Ethernet app:<br> | You can change it to static IP, using the Ethernet app:<br> | ||
{{#ifeq: {{#var:HARDWARE_NAME}} | VAR-SOM-MX6 | [[File:Eth_DHCP_Screen.png]] |[[File:Imx8_Ethernet_DHCP_Screen.png]]}} | {{#ifeq: {{#var:HARDWARE_NAME}} | VAR-SOM-MX6 | [[File:Eth_DHCP_Screen.png]] |[[File:Imx8_Ethernet_DHCP_Screen.png]]}} | ||
= Ethernet static IP configuration = | |||
Click on static IP configuration, add below details<br> | Click on static IP configuration, add below details<br> | ||
* IP Address - For example 192.168.0.3 | * IP Address - For example 192.168.0.3 | ||
| Line 29: | Line 29: | ||
Click on "Confirm" to apply the settings. | Click on "Confirm" to apply the settings. | ||
= Testing = | |||
Click on WebView Browser Test (Android Logo apk) and browse the | Click on WebView Browser Test (Android Logo apk) and browse the Internet normally. | ||
Revision as of 16:54, 1 January 2020
VAR-SOM-MX6 - Android Nougat N7.1.1 - Ethernet
Ethernet Manager is part of the system image by default.
Simply plug in the Ethernet cable and it will connect using DHCP by default.
Ethernet configuration tool
In your desktop menu, you should have an application called Ethernet, as shown in the below image:

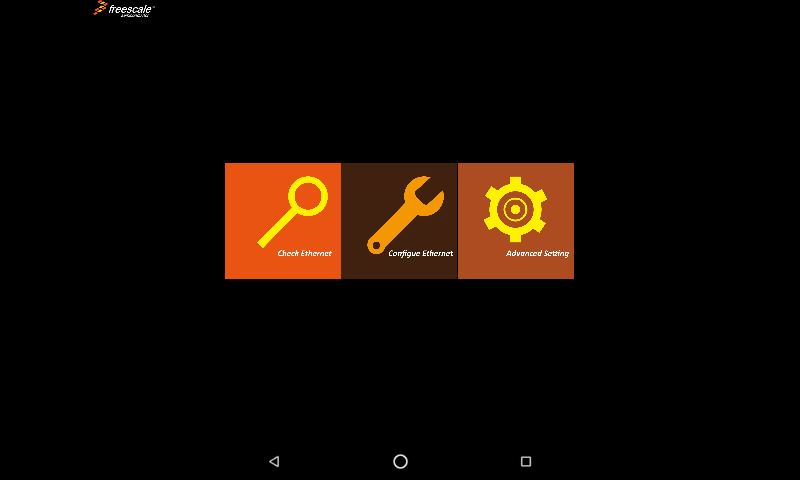
Click on it and you will see the below screen:

Ethernet DHCP configuration
As written before, the default connection type is DHCP.
You can change it to static IP, using the Ethernet app:

Ethernet static IP configuration
Click on static IP configuration, add below details
- IP Address - For example 192.168.0.3
- Netmask - For example 255.255.255.0
- Default Gateway - For example 192.168.0.1
- DNS1 - For example 8.8.8.8 (Google DNS)
- DNS2 - For example 8.8.4.4 (Google DNS)
Click on "Confirm" to apply the settings.
Testing
Click on WebView Browser Test (Android Logo apk) and browse the Internet normally.