VAR-SOM-OM35/7 Windows SDK: Difference between revisions
(Created page with "{{DocImage|category1=Windows|category2=}} =SDK setup and Application Development = __toc__ In order to develop applications for the Windows embedded CE environment, the ...") |
No edit summary |
||
| Line 1: | Line 1: | ||
{{DocImage|category1=Windows|category2=}} | {{DocImage|category1=Windows|category2=VAR-SOM-OM35}} | ||
[[Category:VAR-SOM-OM37]] | |||
=SDK setup and Application Development = | =SDK setup and Application Development = | ||
__toc__ | __toc__ | ||
| Line 93: | Line 94: | ||
*Deploy applicatoin "Start Debugging" ('''F5''') button | *Deploy applicatoin "Start Debugging" ('''F5''') button | ||
<br> | <br> | ||
Revision as of 09:36, 19 January 2014
SDK setup and Application Development
In order to develop applications for the Windows embedded CE environment, the developer is required to
- Install Visual Studio 2005/2008
- Install synchronization application (i.e. active sync)
- Install Variscite's SDK
- Create an pplication
- Simple C/C++ or MFC application
- C#/.NET Application
- Deploy application to device
Visual Studio Installation
Acquire and install the appropriate Microsoft Visual Studio version. Contact Microsoft for more details.
Synchronization Applications
The following application should be installed in order to debug application on the target hardware:
- ActiveSync application for Windows XP and earlier
- Windows Mobile Device Center for Windows Vista, Windows 7
The application may be downloaded free of charge from the site of Microsoft. For more details reference to Microsoft.
Variscite CE SDK Installation
The SDK installation file (.msi) resides on the CD included in your DVK, or may be downloaded from Variscite FTP site. To install the SDK, follow these steps:
- Locate the SDK folder
- On CD: WindowsCE - 1.X.Y\Software\SDK
- On FTP: /OMAP/WindowsCE/Release/x.y.z/SDK/
- Run the SDK installation file
- VAR_OM35xxSBC.msi for VAR-SOM-OM35
- VAR-SOM-OM37_SDK.msi for VAR-SOM-OM37
- On the first page of the SDK installer – Click Next
- On the second page of the SDK installer – Accept the EULA and Click Next
- On the third page (customer information) of the SDK Installer – Click Next
- On the fourth page (setup type) of the SDK Installer – Click Complete
- On the fifth page (destination folders) of the SDK Installer – Click Next
- On the Final page of the SDK installer – Click Install
- To complete the installation of the SDK – Click Finish
Creating Windows CE Application
In order to start developing application for Windows CE, developer should create a solution of the appropriate type.
C/C++ and MFC Application
- Start New Project creation from "File -> New -> Project"
- Choose "Other Languages -> Visual C++ -> Smart Device"
- Choose the desired project type
- MFC Smart Device Application for MFC application development
- Win32 Smart Device Project for Simple C/C++ application development
- Fill project "Name"
- Choose correct project location
- Push "OK" button
- Push "Next" button
- Select the appropriate SDK using < and > buttons
- Continue with custom solution configuration (depends on type of project)
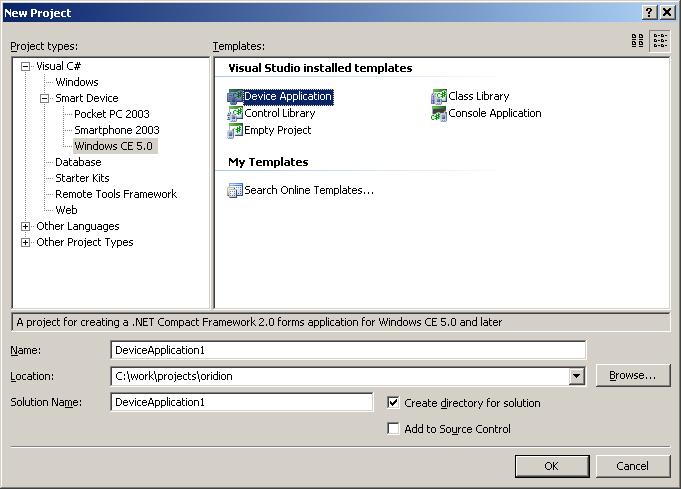
C# / .NET Application
- Start New Project creation from "File -> New -> Project"
- Choose "Visual C# -> Smart Device -> Windows CE 5.0"
- Choose "Device Application" project type
- Fill project "Name"
- Choose correct project location
- Push "OK" button
Application Deployment
- Power up target system (VAR-DVK-OM3x)
- Connect target OTG port to the USB port of the desktop PC
- Wait for ActiveSync connection
- Compile application (F6)
- Deploy applicatoin "Start Debugging" (F5) button


